 |
LanScape Centrex Proxy Server® |
|
|
Getting Started |
|
|
The LanScape Centrex Proxy Server® |
|
|
Proxy Server Configuration |
|
|
Configuration Dialogs |
|
|
Backing up and restoring configuration information |
|
|
Running Multiple Instances |
|
|
Running the proxy server as a service |
|
|
Proxy Plug-in API |
|
|
Deployment Scenarios |
|
|
Help File Version |
|
|
Running the Centrex Proxy
Server™
as a service
The Centrex Proxy Server® can
be executed on the server host machine as an NT service or a Windows service.
The primary advantage of running the proxy server as a service is that
the Centrex Proxy Server® will be started when the host machine is started.
It does not matter if a user logs into the server machine or not. The
Centrex Proxy Server® will also automatically shutdown gracefully when
the server host machine shuts down.
There are many other advantages of running the Centrex Proxy Server® as
a service. When you run your LanScape VOIP server software as a service,
your VOIP server software can be monitored for execution faults and can
be restarted if required. Deploying the Centrex Proxy Server® as a service
will assist you in deploying a "high availability" VOIP system
that will experience minimal down time as compared to VOIP server products
from other vendors.
Note:
The proxy server can be installed as
a service if you use Windows NT 4.x (Service Pack 6a), 2000, XP, 2003
or higher. The proxy server cannot be installed as a service if you are
using Windows 95, 98, or Me operating systems.
Benefits
of running as a service:
Automatically start and stop the proxy server when the host machine starts/stops.
Monitor the proxy server for fault situation.
Automatically restart the proxy server if faults occur.
Periodically restart the proxy server software if need be to help preserver
long term overall server stability.
Create log file data that reflects the fault monitoring activity of the
proxy server.
Running VOIP server software as a service is generally required in secure
network environments.
Introduction: The LanScape
Service Manager™
In order to obtain the highest
level of control and fault tolerant behavior from the Centrex Proxy Server®
and the server host machine, the Centrex Proxy Server® is controlled,
monitored and managed by LanScape's Service Manager software. The Centrex
Proxy Server® and the LanScape Service Manager have been designed to function
seamlessly together to offer a level of up time performance not achievable
by using a stand alone server process or a stand alone NT or Windows service.
The term "service manager" will be used throughout this document
to describe the LanScape Service Manager product suite.
The service manager is used to support all of the added capabilities normal
native Windows operating system services cannot support. The LanScape
Service Manager product suite consists of three program executables:
|
LsServiceManagerTray.exe |
A Win32 application that allows you to display a system tray icon for
the service manager console. This system tray program can be configured
to launch the service manager console if the system tray icon is double
clicked. Its use is optional. |
|
LsServiceManagerConsole.exe |
A Win32 application that is used to install and uninstall the service
control manager service. It is also used to configure the processes that
are managed by the service control manager. All configured processes run
a child processes of the service manager service. |
|
LsServiceManager.exe |
A Win32 service that is the heart of the service manager. This service
performs all server software initiation, termination, process monitoring,
fault detection, server process restarting and event logging. |
The service manager must be
installed on the same host machine that will be running your LanScape
VOIP server software. The following graphic below shows the graphical
user interface of the LanScape Service Manager™
console:

The LanScape Service Manager is included with the Centrex Proxy Server®
product distribution. It will be installed in the same product directory
that you installed your proxy software. For complete details associated
with using the service manager software, please refer to the electronic
help file for that product.
If you have installed multiple LanScape VOIP server products to the same
host machine, you can use a single service manager to control and manage
all of your server software. This means installing the LanScape Service
Manager service once for all server applications. You do not have to run
more than one instance of the service manager service on the same host
machine.
Configuring the Centrex Proxy Server™
as a service
This section will show you the
"short" procedure you must follow to allow your Centrex Proxy
Server® to run as a Windows service. Please refer to the complete LanScape
Service Manager user documentation for additional details.
Creating a proxy server master configuration file:
When you run your VOIP server software as a service, it must use a configuration
file instead of using the Windows registry for its configuration information.
This section will tell you how to create a master configuration file.
Step 1:
Log in to your server machine using an administrator user account. Run
your Centrex Proxy Server® as a normal process and configure it as required
for your deployment.
Step 2:
When you have completed your proxy server configuration, you must create
a configuration file containing all of the proxy settings (normally an
*,ini file image). To learn how to create a proxy server "settings"
file image, please see Backing up the proxy
configuration.
Use the procedure for "Backing up the proxy configuration" so
you create a server configuration file named "CentrexProxyService.ini".
This file should be saved to the same directory that contains the EXE
file image for the Centrex Proxy Server® (CentrexProxy.exe).
Step 3:
Terminate your Centrex Proxy Server®.
Configure your proxy server as a service:
Now you must start the LanScape Service Manager console application and
configure your proxy server to run as a service. The following steps will
show you how to do this.
Step 1:
Start the service manager console application (LsServiceManagerConsole.exe).
The user interface should look like the following:

Step 2:
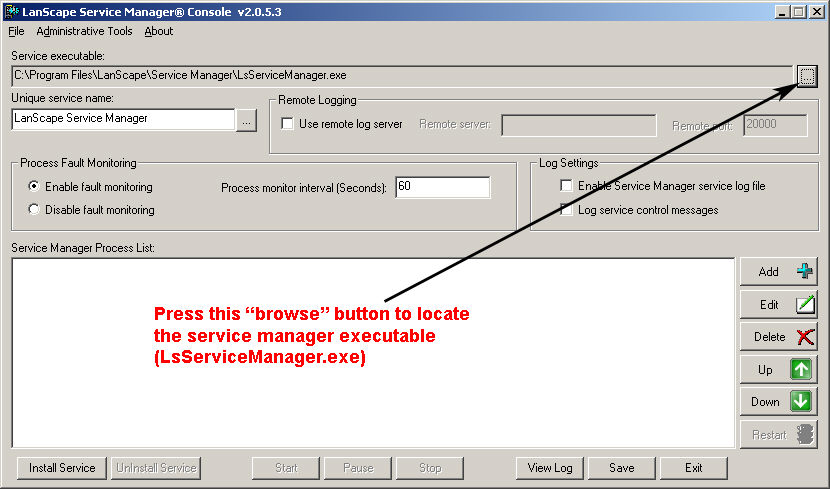
Select the service manager service executable (LsServiceManager.exe). To
do this, press the "browse" button for the "Service executable"
edit field. After you select the proper EXE file image your GUI should
look similar to the following:
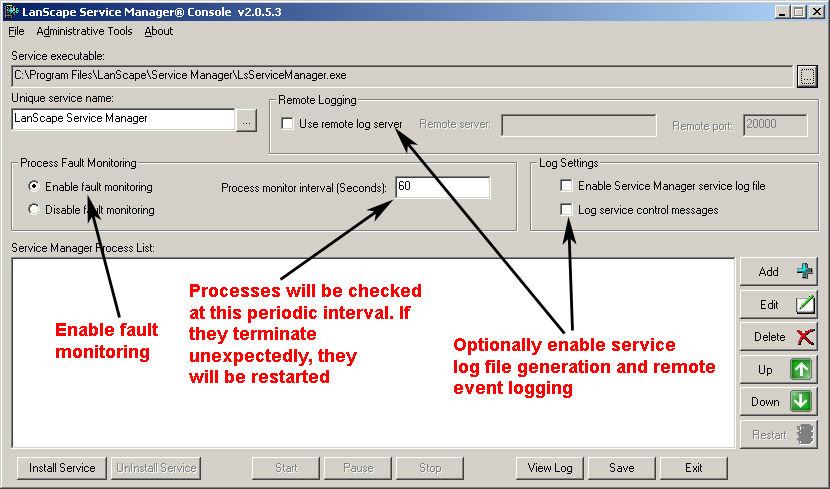
Step 3:
Enable fault monitoring. Having fault monitoring enabled will allow the
service manager service to automatically restart your VOIP server software
in the event that it crashes or unexpectedly terminates.
As an option, you can also specify that the service manager service create
a text log file of its operations. Enable one or all check boxes if desired.
A log file may be useful for debugging system service problems if they
arise. Leave disabled if you do not require service debugging information.
Step 4:
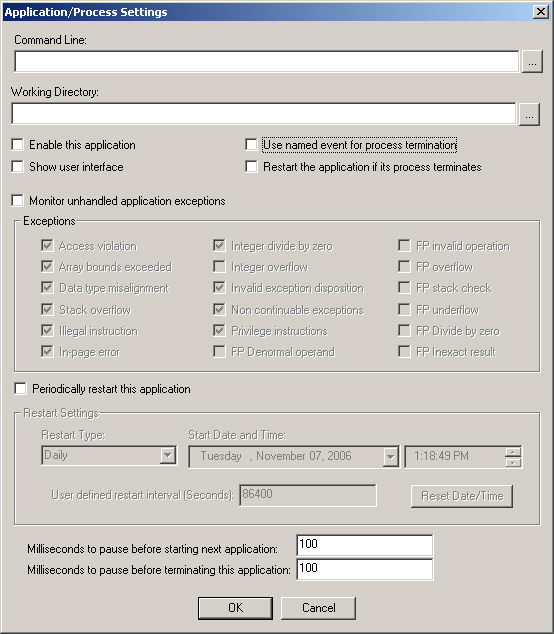
Add your Centrex Proxy Server® to the managed process list. To do this,
press the "Add" button. When you press the Add" button,
a dialog similar to the following will be displayed:
Step 5:
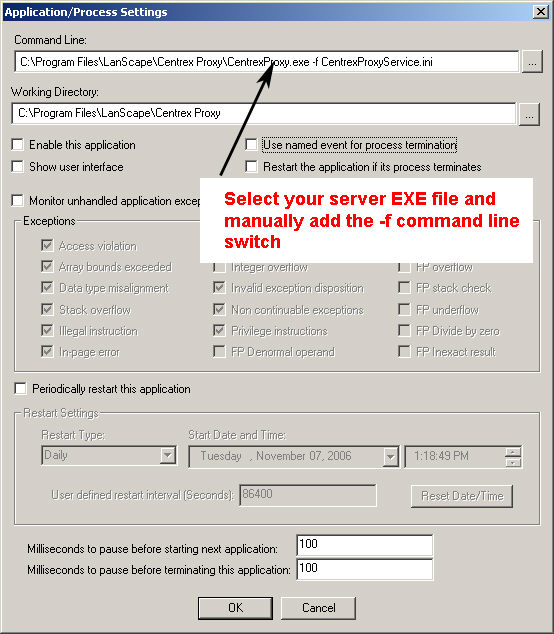
Select the EXE file image for the Centrex Proxy Server® (CentrexProxy.exe).
Do this by pressing the "Command Line" edit control's file browse
button.
Important:
After you select your Centrex Proxy Server®
EXE image, add the -f command line switch to the EXE file's command line.
The -f command line switch specifies the name of your *.ini configuration
file you previously created.
Your dialog should now look
similar to the following:
Step 6:
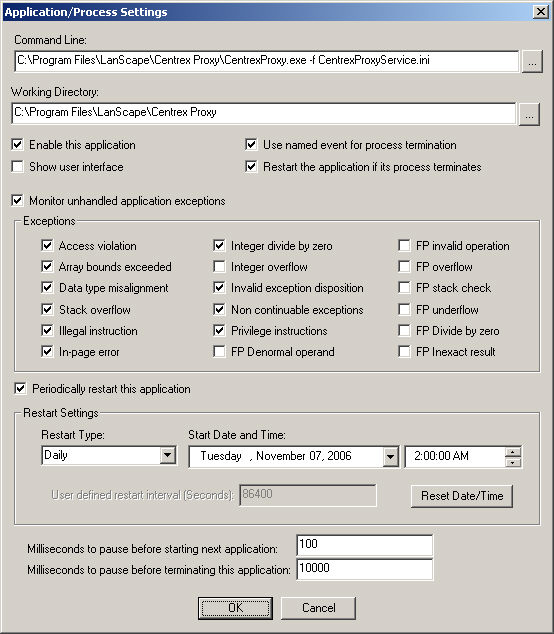
Set appropriate check boxes and process timing parameters:
Looking at the dialog image from Step 5, change the check boxes as follows:
Enable this application: Checked.
Show user interface: NOT checked.
Use named event for process termination: Checked.
Restart the process on critical failure: Checked.
Monitor unhandled application exceptions: Checked.
Notes: You do not
have to change the default exception types that will be trapped when you
enable the "Monitor unhandled application exceptions" setting.
Also, you should set the "Milliseconds to pause before terminating
this process" to 10000 Ms or greater.
Optional:
The service manager service can periodically restart your server software
at the specified interval. Enable this as you require. To keep a clean
server, it may be a good idea to allow your VOIP server software to be
restarted in the middle of the night when it is least likely to be in
operation.
Once you complete this step, your dialog should look similar to the following:
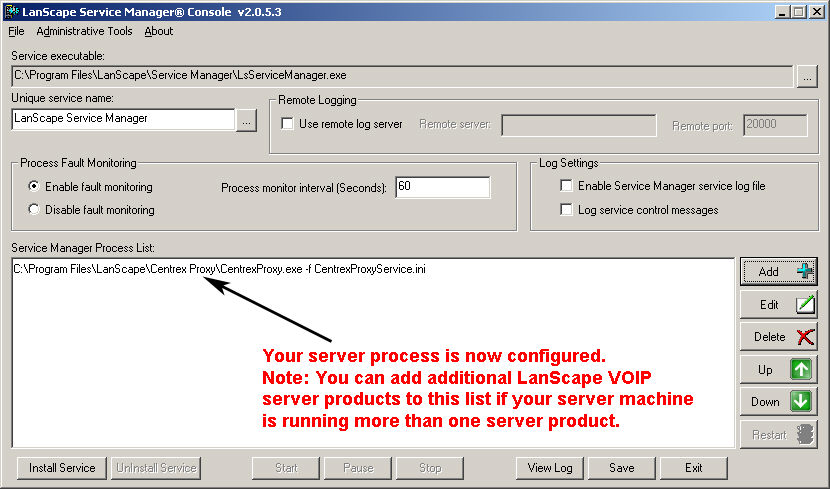
Step 7:
Save your settings by pressing the OK button. Your Service Manager Console
will look similar to the following:
Step 8:
Install the LanScape Service Manager Service. To do this, press the "Install
Service" button. The service manager service will be installed into
your host's service database.
Step 9:
Your LanScape VOIP server software is now installed as a service. Any time
your host machine is started, your LanScape VOIP server software will
start automatically without a user having to login to the machine. If
you want to start your VOIP server software now, either restart your host
machine or press the "Start" button in the LanScape Service
Manager Console.
Stopping your VOIP server from running as a service:
If for some reason you need to stop your VOIP server software from running
as a service, you can do the following:
Step 1:
Log into the server machine using an administrator account.
Step 2:
Start the LanScape Service Manager Console application (LsServiceManagerConsole.exe).
Step 3:
Press the "Stop" button to stop the service manager service.
Doing this will shut down your VOIP server software.
Step 4:
Press the "Uninstall Service" button to uninstall the LanScape
Service Manager service.
Step 5:
The service manager is now uninstalled and your VOIP server software will
not automatically start when your server machine starts.
|