 |
LanScape Centrex Proxy Server® |
|
|
Getting Started |
|
|
The LanScape Centrex Proxy Server® |
|
|
Proxy Server Configuration |
|
|
Configuration Dialogs |
|
|
Backing up and restoring configuration information |
|
|
Running Multiple Instances |
|
|
Running the proxy server as a service |
|
|
Proxy Plug-in API |
|
|
Deployment Scenarios |
|
|
Help File Version |
|
|
Network Configuration
The following dialog is used to specify network configuration settings
for your Centrex Proxy Server®:
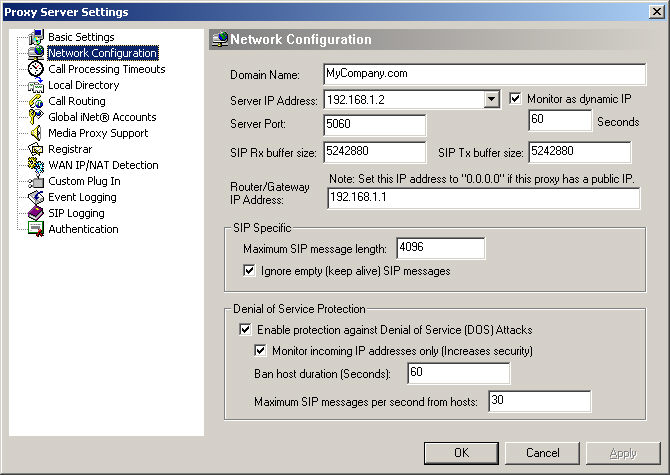
Domain
Name:
Use
this setting to specify your VOIP domain name. This is the same as the
SIP protocol domain name. Any domain name that can be resolved using DNS
can be specified here. This included dynamic domain names offered by leading
dynamic DNS service companies. If you are setting up a private VOIP network
that does not use a domain name, then you must specify the host name of
your server machine. The host name of your server machine will then be
used in place of a typical domain name. For private VOIP networks, the
host name you specify must resolve to an IP address within your network.
Server IP Address:
Allows you to specify which host IP address the Centrex Proxy Server® will
use.
Monitor as dynamic IP:
You should enable this setting if the Centrex Proxy Server® will use a
dynamic IP address as its primary IP address. If you select an IP address
that is static, then this setting can be disabled. If enabled, you must
specify a monitor interval (in seconds) that will be used to detect new
dynamic IP addresses.
When enabling this setting, the Centrex
Proxy Server® will monitor the associated network adaptor for IP address
changes and apply those changes as appropriate. This capability is especially
useful for deployments where obtaining a static IP address is not possible.
Server Port:
Use this setting to specify the UDP port the Centrex Proxy Server® will
listen on in order to receive SIP protocol packets. Normally for the SIP
protocol and for simplicity of SIP URI addresses, this value is normally
set to 5060. However, you can set this to whatever port you want. Note
that the Centrex Proxy Server® uses symmetrical signaling to assist in
overcoming NAT related issues. Symmetrical signaling is just a fancy way
of saying the Centrex Proxy Server® sends and receives SIP protocol packets
using the same configured UDP port.
SIP Rx buffer size:
This setting allows you to specify the
size of the SIP UDP network receive buffer. Normally you should not change
this value. Setting this value to a large number will ensure that all
received network UDP data gets queued internally for processing. Setting
this value too low may result in lost received SIP messages.
SIP Tx buffer size:
This setting allows you specify the
size of the SIP UDP network transmit buffer. Normally
you should not change this value. Setting this value to a large number
will ensure that your Centrex
Proxy Server® will not block waiting for your operating system to transmit
buffered up SIP protocol messages. Setting this value too low may result in
degraded proxy transmit performance.
Router/Gateway IP Address:
The Centrex Proxy Server® can be deployed in your private network (located
directly behind your outermost NAT router) or in the global IP address
space. The simplest case it to deploy the Centrex Proxy Server® in the
global IP address space. In this case, you do not need to specify a specific
"Router/Gateway IP Address". For global address space deployments,
you must specify a "Router/Gateway IP Address" of "0.0.0.0".
One possible drawback of deploying your Centrex Proxy Server® into
the global IP address space is that anyone on the internet can have access
to your Centrex Proxy Server® machine.
For added security, the Centrex Proxy Server® can also be deployed behind
your outermost NAT router. This will allow the Centrex Proxy Server® to
operate in your private IP address space and benefit from the security
that your outermost NAT router provides your private network. Of course,
if you deploy the proxy behind your outermost NAT router, you will have
to modify the router's port settings to forward any received UDP data
to your Centrex Proxy Server® host machine's SIP port (default is 5060).
Maximum SIP message length:
Depending on your VOIP telephony network, the SIP user agents (soft phones)
and the SIP devices you are using, SIP protocol data length can vary.
This setting allows you to specify the maximum data length in bytes for
received SIP protocol packets. If the Centrex Proxy Server® receives a
SIP protocol packet that exceeds this setting, you will be notified of
the error. In this case, you will need to increase the value of this setting.
Ignore empty (keep alive) SIP messages:
Some SIP devices and soft phones have the ability to send "keep alive"
SIP messages when they are located behind a firewall or NAT router. The
purpose of these keep alive UDP messages is to keep a session open in
the firewall or NAT router so that the SIP device can receive incoming
phone calls.
These "keep alive" SIP messages generally contain one of the
following types of data:
1)
All white space characters.
2)
All NULL (zero) data bytes.
3)
A single ASCII '0' character.
and
cannot be parsed into a standard SIP protocol message.
If you use SIP devices or software that use these types of keep alive packets,
you should enable this option. If you do not enable this option, the proxy
will detect the keep alive SIP packets as an erroneous SIP message and
log an error.
Enable protection against Denial of Service (DOS) attacks:
Enable this setting to allow your Centrex Proxy Server® to detect hacker
denial of service attacks. For most applications, you will want this feature
enabled. If enabled, your Centrex Proxy Server® will be able to determine
when another computer or device is attempting to send the proxy too much
UDP network data. If the level of UDP network data exceeds your specified
set points, then the Centrex Proxy Server® will start filtering UDP data
packets from that particular network source.
Monitor incoming IP address only:
Enabling this setting increases your security against multiple DOS attacks
originating from the same host machine. Disabling this setting decreases
the risk of identifying multiple DOS attacks from the same malicious machine.
We recommend that you keep this setting enabled.
Ban host duration:
Once the Centrex
Proxy Server® identifies that a malicious host machine is performing a
denial of service attack against the proxy, the proxy will ignore further
data that is received from the offending host machine. This setting specifies
the amount of time the Centrex Proxy Server® will ignore UDP network data
from the offending host. Any data that is received from the offending
host is ignored during this time interval.
Maximum SIP messages per second from hosts:
This setting control the trigger point for detecting denial of service
attacks. If the Centrex Proxy Server® receives more UDP data packets from
any machine that exceeds the rate specified by this parameter, then the
Centrex Proxy Server® will identify the originating host machine as performing
a DOS attack.
|