|
|
LanScape Centrex Proxy Server™ - User's Reference |
|
|
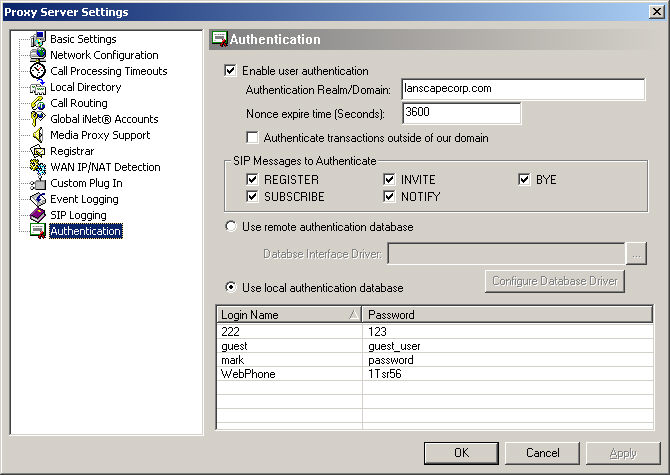
AuthenticationAuthentication is an important aspect of network telephony. By enforcing
the use of authentication credentials for different VOIP realms or domains,
soft phone users and/or VOIP service providers can control who is able
to access particular network features and who is allowed to call specific
call endpoints. The authentication mechanism your Centrex Proxy Server®
supports is called "Digest authentication using the MD5 hashing algorithm".
Enable user authentication: This setting must be enabled if
you want the Centrex Proxy Server® to enforce user authentication. This edit field allows you to
specify the authentication "realm" you are enforcing. Generally
you set this to your VOIP domain name as specified in the "Domain
Name" field of the Network Configuration
dialog. However, the authentication realm can be set to any string value
you want. Note: Some soft phones and IP phones will use their configured
domain name when authenticating so you may have to set this to your domain
name if you are using such restricted SIP user agents. When the proxy performs authentication,
a special value called the "nonce" value is used during the
authentication process. To ensure that user's are required to reauthenticate
from time to time, this value can be set to expire after a specific timer
period has elapsed. Without getting into the minute details regarding
nonce values, all you need to know is that when the proxy's nonce value
expires (and a new nonce value is assigned), all proxy clients will have
to reauthenticate with the proxy. Allowing a timed nonce value increases
the security of your VOIP phone system. LanScape
recommends that you set this value to 30 seconds or greater. Setting this
value too small (less than 10 seconds) can cause session connection problems. This setting allows the proxy
to authenticate SIP transactions that are received but not specifically
addressed to the configured SIP domain. There are various reasons why
authenticating transactions outside of the domain are required. However,
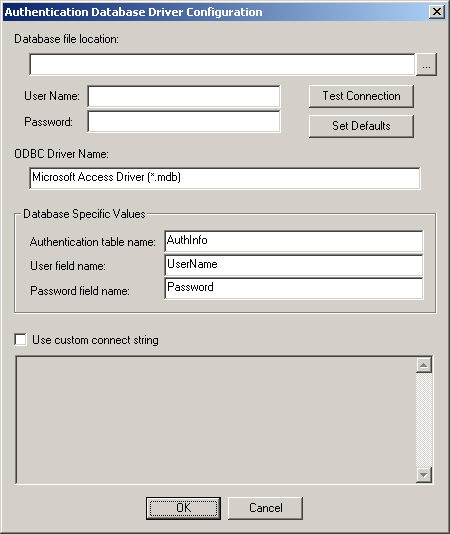
we recommend that you keep this setting disabled. Authentication table name: This setting allows you to specify the name of the data table in your authentication database. For LanScape supplied authentication databases, this table name is "AuthInfo".User field name: This setting allows you to specify the name of the record field that contains the authentication user name. This user name is also known as a "login name". Password field name: This setting allows you to specify the name of the record field that contains the authentication password. Using a remote authentication database The
professional and enterprise versions of the Centrex Proxy Server® have
the ability to access authentication information from a remote database.
This capability is useful if you are a service provider and you provision
your user accounts from a common authentication database. If you deploy
more than one Centrex Proxy Server®, all servers can be configured to
obtain authentication information from the same remote database. After you have specified the path
to the authentication driver DLL, press the "Configure Database Driver"
button. When you do, a dialog similar to the following will be displayed: Note: The LanScape Centrex Proxy Server® ships with an empty Microsoft Access and MySQL authentication database images. If you are planning to use an external Microsoft Access authentication database image, you can use this dialog to select the database file image (*,mdb). Optionally supply a valid username and password if required. Once you have selected your database image, press the "Test Connection" button to verify that you can access the database. Press the OK button when you are finished. If you are planning to use an external MySQL or similar database, you can use this dialog to specify the ODBC driver settings that are required to access the database. In this case, you will want to enable the "Use custom connect string" in the dialog shown above. When you enable this setting, the edit control will be enabled and you can enter your ODBC connect string. Next we will present a few ODBC configuration examples that will help to clarify what is required. Example 1 - Access database on the local machine: Driver={Microsoft Access Driver (*.mdb)}; Dbq=D:\MyAuthenticationDatabase\AuthDatabase.mdb; Uid=; Pwd=; Example 2 - Access database on remote machine. Requires a share to be created: Driver={Microsoft Access Driver (*.mdb)}; Dbq=\\DatabaseServer\D\MyAuthenticationDatabase\AuthDatabase.mdb; Uid=; Pwd=; Example 3 - Access database on remote machine, using IP address. Requires a share to be created: Driver={Microsoft Access Driver (*.mdb)}; Dbq=\\192.168.1.80\D\MyAuthenticationDatabase\AuthDatabase.mdb; Uid=; Pwd=; Driver={MySQL ODBC 3.51 Driver}; Server=localhost; Database=authdatabase; User=root; Password=rootpassword; Option=4; Driver={MySQL ODBC 3.51 Driver}; Server=DatabaseServer; Database=authdatabase; User=root; Password=rootpassword; Option=4; Once you
specify your ODBC connect string in the dialog above, you can verify that
you can connect to the database by pressing the "Test Connection"
button. The Centrex Proxy Server® can
also use a local proprietary database image for authentication information.
This capability is most useful when deploying a single Centrex Proxy Server® in a small office/home
office (SOHO) environment or where a remote database is not required. At the
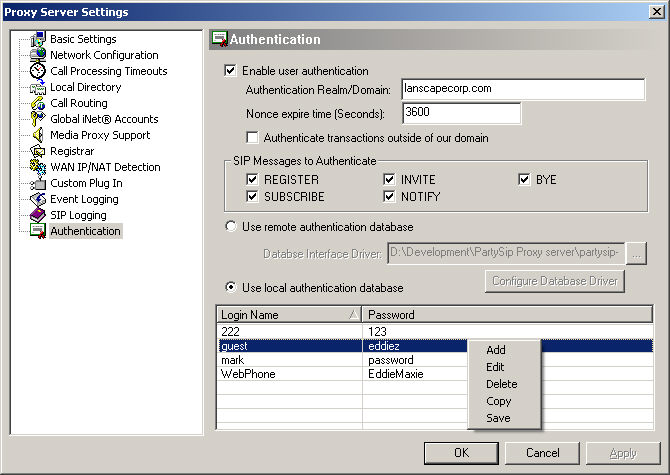
bottom of the authentication configuration dialog, there is a list control
that is used to display the local authentication settings the proxy will
enforce. If you right click in the list box, you will be presented with
a pop up menu as shown in the following dialog:
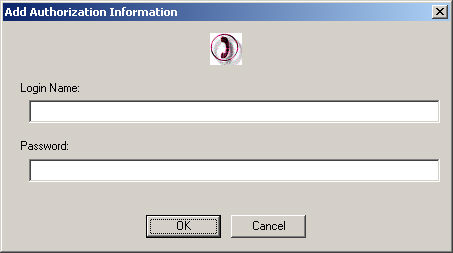
Add - Adds a new authentication entry. Adding local authentication settings: When you enable challenge authentication,
you must define at least one authentication entry. If you only want to
define a single authentication entry, then you will force each user of
your VOIP domain to use the same login name and password. This is perfectly
fine for small "trusted" VOIP domains. However, for large deployments,
especially for those deployments involving the general public, you probably
will want to assign each user of your VOIP domain a specific login name
and password. That way, if you want to lock a specific user out of your
VOIP system you can simply delete their authentication entry from the
list.
Type in the login name and authentication
password for the user. Press the OK button when you are finished.
LanScape Centrex Proxy Server® May 2014
Post
documentation comments to: http://www.lanscapecorp.com/asp
files/Documentationfeedback.asp |