Basic Settings
The following dialog is used to specify basic configuration settings
for your Centrex Proxy Server®:
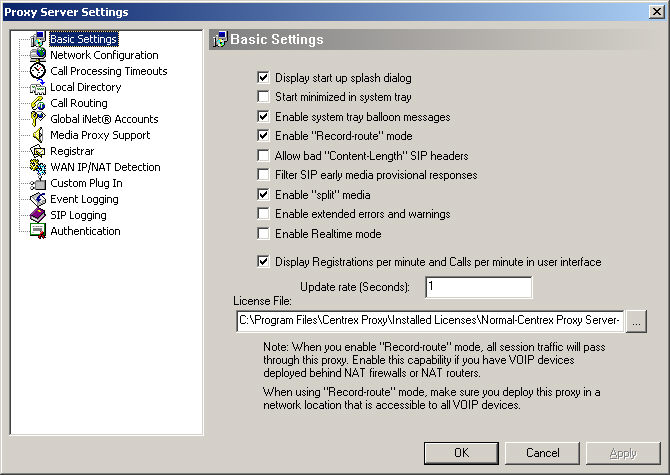
For most installations, you should maintain all of the default settings
you see above.
Display
start up splash dialog:
Enable/disable the display of
the startup "splash" dialog.
Start minimized in system tray:
If this item is checked, the Centrex Proxy Server® will immediately minimize
to the system tray area when it starts up. If this item is not checked,
then the Centrex Proxy Server® will start up normally and display its
user interface.
Enable system tray balloon messages:
If
this item is checked, the Centrex Proxy Server® will display in the system
tray user messages during the normal course of operations.
Enable Record-route mode:
Record
routing is a mode of the SIP protocol. This setting enables or disables
the Centrex Proxy Servers ability to process SIP related record-route
headers. For all applications, make sure this setting is enabled. Under
special circumstances, LanScape support may ask you to disable this setting.
Allow bad "Content-Lengh" SIP headers:
If
your Centrex Proxy Server software reports that it is experiencing errors
due to receiving SIP protocol messages that have improper "Content-Length"
SIP headers, you can enable this setting to remove the proxy reported
errors. Under normal operation, you should not enable this setting. Doing
so will disable the Centrex Proxy's ability to detect partially received
or corrupt SIP protocol packets. This setting should only be used temporarily
until you or the manufacturer fixes your SIP device or user agent client.
Filter SIP early media provisional responses:
When
enabled, this setting will allow the
Centrex Proxy Server to filter
all 1xx provisional SIP responses that contain "early media"
SDP when they are received. You will want to enable this setting if some
or all of your SIP devices in your VOIP domain do not properly handle
early media SDP in provisional responses. If you are in doubt about this
setting, you should leave it unchecked.
Enable "split" media:
When enabled, this setting will allow the
Centrex Proxy Server (and any
co-deployed LanScape VOIP Media Proxy servers) to handle "split"
media deployment scenarios.
The term "split" media refers to the case where call media may
not propagate through the same IP addresses that are used for session
initiation at the call endpoints.
Split media is particularly useful when interfacing the Centrex Proxy Server
to a PSTN gateway service provider that handles SIP session information
using a server at IP address #1 but manages call media flow through another
RTP media server at IP address #2.
A good example of a real world deployment of split media would be terminating
and receiving calls to/from a PSTN gateway provider. The PSTN gateway
provider could have deployed a Cisco PGW 2200 SIP call controller at IP
address "a.a.a.a" and the Cisco AS5400 media gateway at IP address
"b.b.b.b". The handling of SIP and RTP media at different IP
addresses can be handled properly when the Centrex SIP Proxy has its "Enable
split media" setting enabled. When enabled, the Centrex SIP Proxy
and LanScape VOIP Media Proxies will handle split media as appropriate.
If you are in doubt regarding this setting, leave it disabled.
Enable extended errors and warnings:
If enabled, this setting allows the Centrex Proxy Server® to display (in
the event log area) additional errors and warnings that normally will
not be displayed. We recommend that you keep this setting enabled. If
you do not want extra error and warning support, un-check this setting.
Enable Realtime mode:
Allows the Centrex Proxy Server® to execute in Realtime mode. Normally
the proxy executes with a high priority mode. This high priority is more
than sufficient for call handling. Only use this setting if the proxy
seems to fall behind when processing a large number of calls per minute.
WARNING:
Enable
this setting at your discretion. It is possible that in realtime mode,
the Centrex Proxy Server® can consume all available CPU time and other
programs you have running on the host machine will never get a change
to execute. Depending on the operating system you are using, this may
include some critical operating system tasks. Before you enable this setting,
try removing all other unnecessary executing applications on the
server machine to see it you can get the performance you require. If you
can not achieve the call processing performance without enabling this
setting, you might want to think about purchasing a more powerful host
server machine.
Display Registrations per minute and ...:
If you enable this setting, the Centrex Proxy Server® will display
performance data in the user interface. If enabled, the following information
will be displayed: The number of registrations per minute. The total number
of registrations processed since the proxy server was started. The number
of call per minute. The total number of calls processed since the proxy
server was started. When you enable this setting, you will also have to
specify a valid update rate using the "Update rate" edit control.
License File:
This edit field allows you to specify the license file that will be used
by the Centrex Proxy Server®. normally this value is initialized when
you install the software. The license file that was issued to you by LanScape
is only valid for the machine it was requested for. If you have to replace
the network adaptor you used to generate your license request or if you
need to move your server software to another host machine, you must contact
LanScape support so that we can reissue you a new product license. Before
requesting a new product license, make sure you have your original purchase
invoice number at hand. Sorry, but we cannot reissue product licenses
for lost, stolen or deleted license
files. No exceptions.
|